Preamble: I realize this tutorial is a tad on the lengthy side. Every step I’ve included is for your betterment. If you’re too lazy to accomplish this yourself, I am for sale. Just kidding. Not really.
There are two reasons why the Good Badger has been placed onto this planet:
- To turn you into a more efficient Internetter
- To make cat videos
This particular post falls under category #1.
Unlike partying, using your e-mail like it’s 1999 is something to be avoided. Unfortunately, I notice far too many who fit this description (e.g. anyone who uses AOL). Although the basic idea behind e-mail hasn’t changed much throughout the years (despite Google’s best efforts), the capabilities within these clients has drastically improved.
So you may be asking, what separates an e-mail amateur from a maestro? Essentially it all boils down to efficiency mixed with a splash of flash. Take a few minutes to learn how to improve your e-mail tactics and you’ll ultimately save hours throughout the year (which you can then spend watching cat videos). I now present to you
The Good Badger Guide of How to Become an E-mail Maestro.
Step 1 – Use Gmail
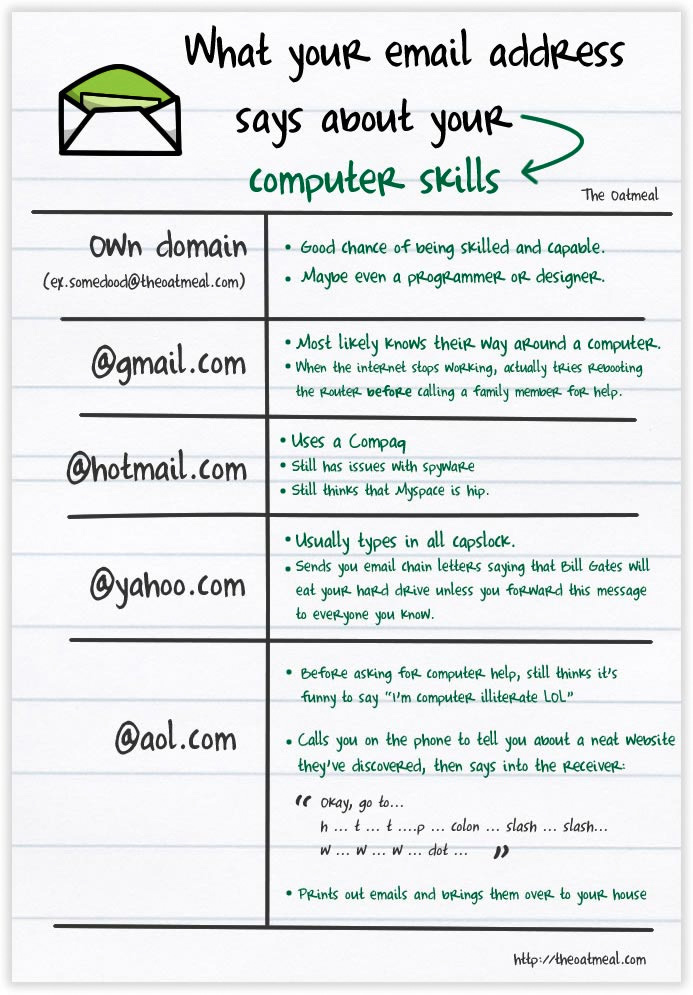
This is non-negotiable. Gmail is better and this isn’t just because I use it and like to root for the home team. This is because I (have) use(d) all e-mail clients, and know first hand their wide array of services (or lack thereof). Gmail has more storage, better flexibility, more bells and whistles, is more intuitive and most importantly…is agreed upon as the top e-mail client by nerds. ATN (always trust nerds).
The Oatmeal summarizes someone’s web competence as determined by their e-mail client.
Step 2 – Stop logging into multiple e-mail accounts
“But The Good Badger” whimpers the fictitious voice, “I need and use all 6 of my e-mail addresses. One is personal. One is work. One collects SPAM but still check religiously because it has my name in the ‘To:’ field. One I made and then forgot about, and then had to make another because I forgot the first but then forgot both. Etc.”
I’m not telling you to only have one e-mail address. No one can survive on just one e-mail address anymore. That’s ludicrous. I literally have double digit e-mail addresses. I have forgotten more e-mail addresses than most Baby Boomers will ever have. My Internet presence has taken on many forms: old and contemporary, personal and “professional”, customer and client. If I took the time to check each e-mail address every day, my life would be consumed with password recovery, figuring out different interfaces, managing multiple contacts lists, and mostly- hating myself. I’m better than that and so are you.
So, now that you’ve got your brand new (or old) Gmail address it’s time to make some magic happen. Your Gmail address is now the spine of your e-mail roster. Admit it, accept it, embrace it.
In other words, from now on we are only logging into one e-mail address – while still being able to check all the others.
Let’s examine our two paths for consolidating all of your e-mail addresses down to one login.
Importing
Let’s start with importing. This is the preferred option if you have a lot of contacts and/or different folders in your other account(s). Also note, that importing will bring in ALL of your e-mail from your old account, not just the new messages. If you do go the importing route, be sure to set up a filter first (explained below). If you don’t your inbox will quickly become a clusterF of chaos.
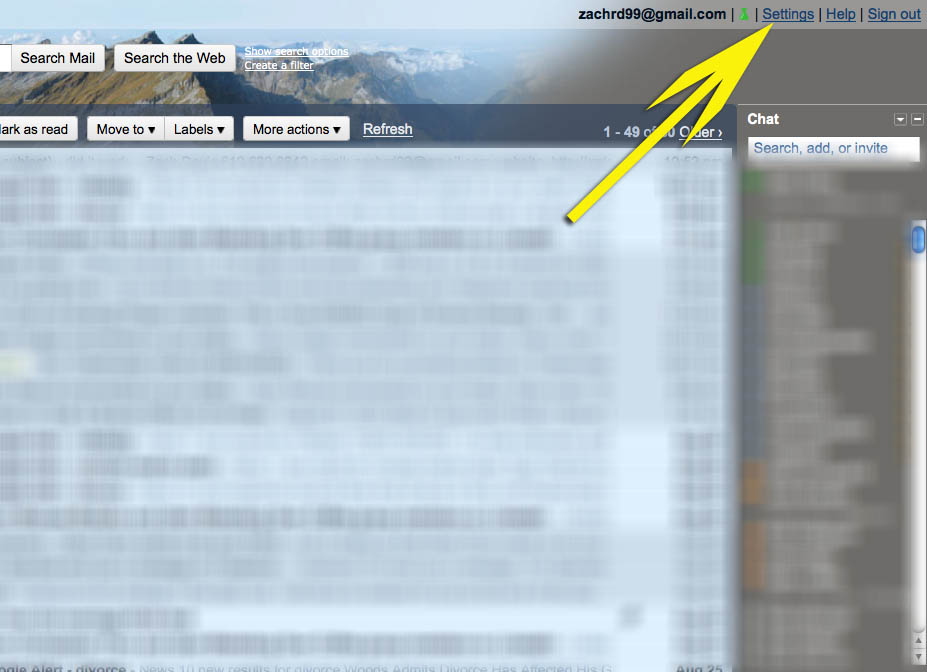
First, log-in to your new account@gmail.com address. In the top-right portion of the page you’ll see “settings”. Become very familiar with “settings”
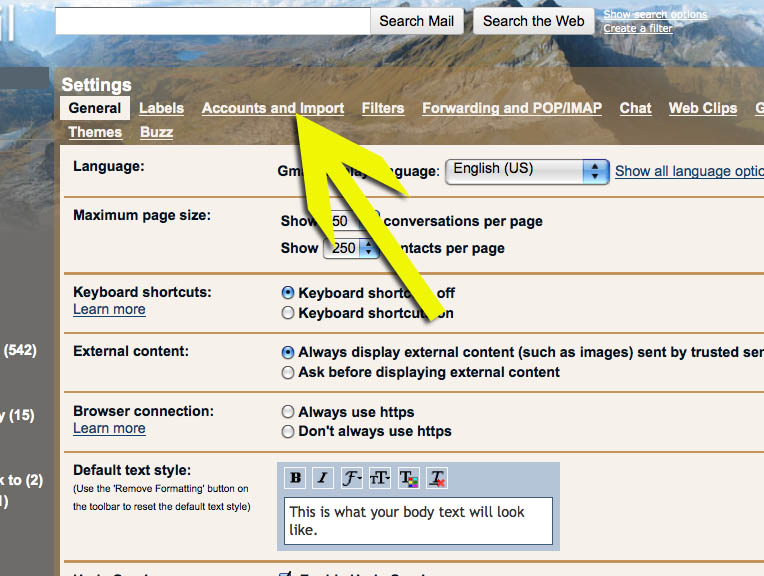
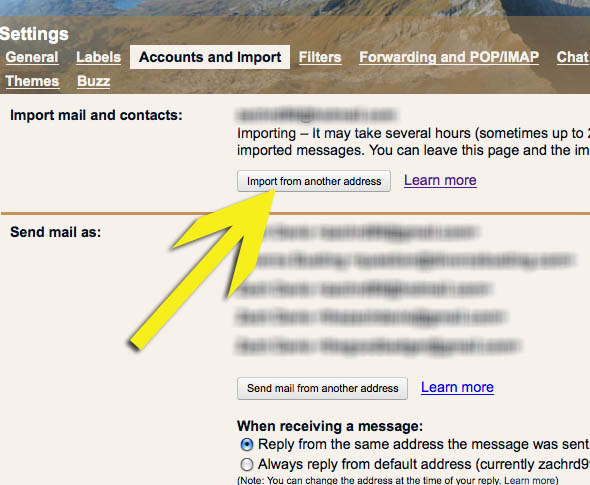
Next, click on the “Account and Import” tab
Click the “import from another address” box:
Input all of the relevant information from your old, inferior e-mail client. That’s it, you’re done.
One of the nice things about importing is that it doesn’t require you to do any work from within the non-gmail account. Once you input the e-mail address/password, it will begin to pull your messages and data automatically.
(If you want to import your contacts from Outlook to Gmail, read this article)
Fowarding
I prefer this option – mostly because I’ve accumulated an ocean of SPAM and don’t really care to have it duplicated into another e-mail address. You can still import your contacts manually, just Google “(your e-mail client) contacts to GMail”. Nerd secret #1 – 98% of technology problems can be answered in 3 seconds via Google.
Having your e-mail forwarded needs to be set up from your other e-mail client. This will be in the Settings or Options link from within said client. If you can’t find it, again Google “forwarding (X e-mail client) to Gmail”.
Ok, now we’ve got your inferior e-mail feeding into your superior e-mail. This step is as necessary as it is boring. Now lets get a little more involved.
Step 3 – Using Labels
What in the Shake Weight® is a Label? You know what a folder is. A label is like a folder, only better. When you set up a “Family & Friends” folder and a “Pictures” folder, and your mom sends you an adorable photo of you as a 4 year old ruining your older sister’s pool party by jumping into the pool…naked, what folder does it go in? The correct answer is both. Unfortunately with folders, without making a copy of the e-mail, which is an unnecessary extra step, you have to choose. Too much time is wasted digging through the wrong folder. In Gmail, you can apply as many labels to one e-mail or thread (group of e-mails) as you’d like.
What’s important is not that labels are superior to folders (even though they are), but to utilize them in order to maximize organization. Think about all of the categories you use your e-mail for. I have one set up for every side project I’ve ever worked on, one for flight itineraries, one for pictures, one for important documents, etc. For the purpose of this tutorial, however, the important labels to set up are for your other e-mail accounts.
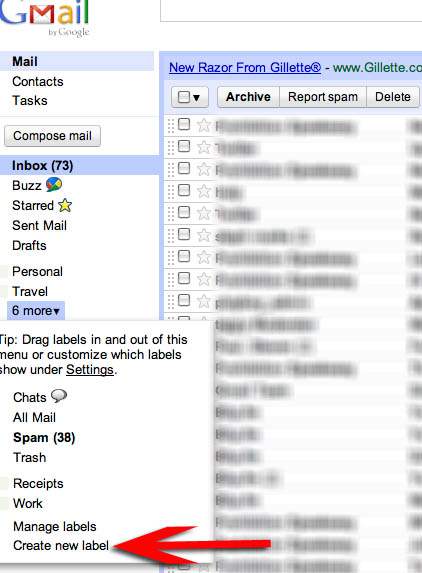
Setting up a label is easy. Just click the “more” tab on the left side of the screen, and then “Create new label“:
You’ll notice a nice array of colors that can be tied to each label. Why? Because when you approach a stop sign you don’t have to read “STOP” to understand what driving action to take, the red sign is enough. Your brain will quickly be able to associate a theme to a labeled e-mail without having to read through any of the subject matter. Gmail 1, everything else 0. (Note: once you set up filters, labels can automatically be applied to incoming e-mails).
Step 4 – Setting Up Filters
Hands down, this is the most crucial step to becoming an E-mail Maestro. Take 3 seconds to think about who your best friend in life is. Someone truly very close to you- this person knows you better than you know yourself. Now- pick up the phone, call this person, and tell them they’ve been replaced. Filters are your new best friend.
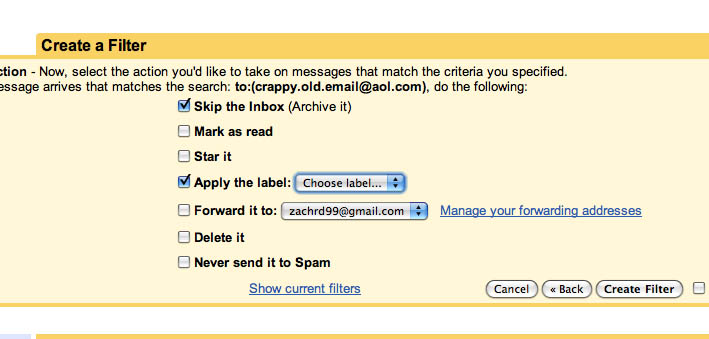
Now that you’ve already got a label in place for each separate e-mail account, we’re going to set up a filter to send each respective incoming e-mail the appropriate label.
First, go back to “Settings” at the top of the page. (you know where this is by now)
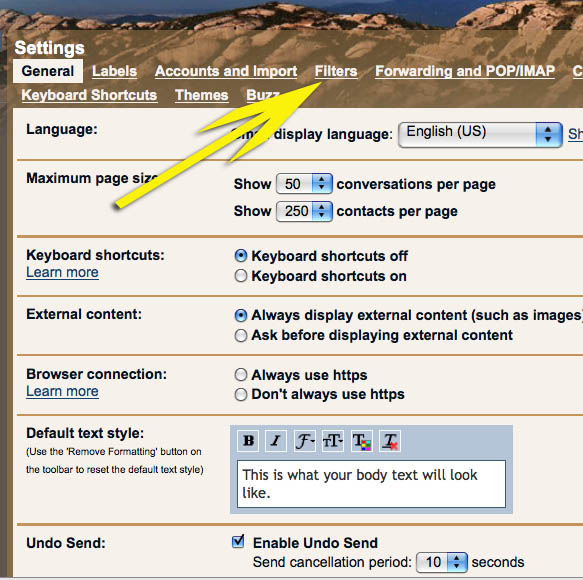
Next, click the “Filter” tab.
Then click the “create a new filter” option.
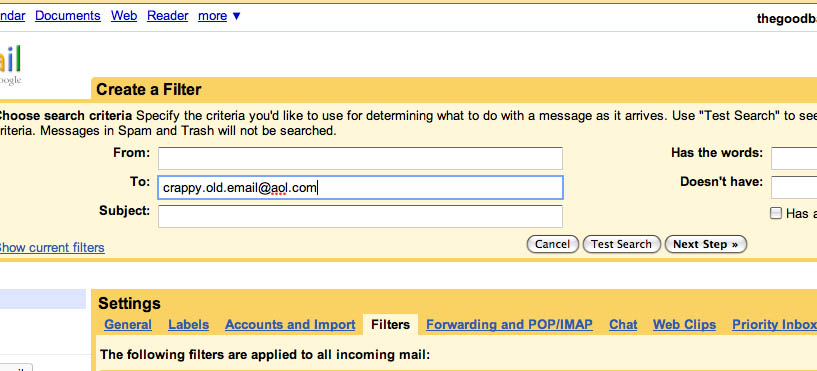
In the “To” field, input your crappy.old.email address.
“Next Step”
Then select the “Apply the label” box along with the appropriate label in the drop down.
Then select the “Skip the Inbox” box to help separate your different e-mail accounts and reduce clutter. (Optional although recommended)
Click “Create Filter” and, that’s it, you’re done.
Repeat this step for as many different e-mail addresses that you’ve got forwarded to your main Gmail account. I also encourage you to discover common themes in your e-mail and apply labels to those as well. One example would be an “Important” label and setting up a filter that includes your boss’ e-mail address in the “From” field. The more filters you set up, the cleaner, and ultimately more efficient your e-mail habits will become.
Step 4a – “Send Mail As” Default
Now you’ve got all of your e-mail accounts going into separate labels, however, when you go to reply to an e-mail sent to another account, the default “From” address will still show your main.account@gmail.com address. This is bollocks.
Calm down, we can change this.
- Go back to “Settings” at the top of the page,
- Select the “Accounts and Import” tab.
- Click the “Send mail from another address” box.
- Input your name and e-mail address,
- click “Next step“
- choose the “Send through Gmail” option
- “Send Verification“
- Go to this other e-mail address (*hint* you don’t have to leave your Gmail account to do this)
- Open e-mail and click on the confirmation link (it might take a minute for the e-mail to arrive, be patient)
- Repeat 1-9 for every other e-mail address you’ve got set up
Stop dancing, we’re not done yet. The default from address is still the same Gmail address. To change this:
- “Settings” at the top
- “Accounts and Import” tab
- In the “Send Mail As” column, notice the “When receiving a message” area
- Change the option to “Reply from the same address the message was sent to“
Now, every time you respond to an e-mail, the default “From” field will be the address it was sent to. You can still change it within that given reply e-mail if you’d like.
Step 5 – Bells, Whistles, Flash and Magic
The previous 4 (+) steps lay the foundation to make your e-mail organizational skills second to none. Step 5 intends to cover your whole e-mail experience in a thick layer of awesome.
Within the “Settings” option at the top of the page, click on the “Labs” tab (If Filters is your best friend, Labs is your friend with benefits). Within Labs, there is an extensive list of really cool options you can add to your Gmail account. For the sake of keeping this post from becoming a novel, I’ll give you my top 3.
Must Have Lab #1: Text Messaging (SMS) in Chat
I haaaaaaate text messaging. If you send me a text, there is a 65% chance you’re either not getting a response, or at best, you’re a couple hours away from getting a reply. I feel this way not because I think it’s too impersonal, I’m worried about my bill, or that I don’t like you. It simply takes too long. When my fingers can’t keep up with my brain, immediate frustration and a neglected text message is the result.
Until Google intercepted my telepathic frustrations.
By enabling the “Text Messaging (SMS) in Chat” feature, you can respond to your texts at the speed of light (assuming you type lighting fast – like me). Within the chat section of Gmail (by default on the left hand side under the labels), search the name of the friend you would like to text message, and the “Send SMS“ option will appear. Sending a text looks the same as an instant message on your end, and a text on theirs. If this person is not in your contacts list, you can send a text by enabling the “SMS in Chat” Lab and entering the phone number manually. I do, however, encourage you to diligently update your contacts list. You should also sync your Gmail contacts with your smartphone – this tutorial will show you how.
A couple of notes on this feature:
- The phone number that shows up will not be yours (usually a 406 area code number), but it will show your e-mail address. You should still explicitly tell the person who is texting them.
- If they reply and you’re not on your e-mail at the time, the message will get sent to your inbox.
- You can do this within Google Voice as well, except the text also gets sent to your phone. Google Voice is amazing and deserves a post all to itself.
Must Have Lab #2: Undo Send
When the Good Badger gets a Wikipedia page in his honor, undoubtedly the first sentence will read, “The Good Badger (born 1985) is dumb.” Facts are facts.
On a way too regular basis I either am sending an e-mail to the wrong person, failing to proof read, or forgetting the intended purpose of the message in the first place. I usually realize this .2 seconds after clicking the send button (accompanied by my stomach declaring a civil war).
Gmail has moron-proofed this issue by including an “unsend” feature at the top of the Gmail interface after you send a message. Obviously, the message doesn’t get sent and then retracted, instead it sits in a “pending send” field somewhere in the ether, and waits for you to be sure before completing its mission. If this saves you only one time, you will instantly realize its value.
Must Have Lab #3: Forgotten Attachment Detector
It turns out this is no longer a lab, it was so awesome, that they just made it a default feature. I already had decided that I was going to make this my must have #3 and don’t adapt well to change, so just go with it.
Must have Lab #3 is really an extension of #2, with the theme being Zach = Dumb. Here is a sample e-mail I write on a regular basis.
Dear person,
Attached is that thing you asked for.
Sincerely,
The Good Badger
Of course I forget to attach anything, rendering the entire message a waste of everyone’s time. Gmail, again, was smart enough to create a feature that scans the text looking for phrases including the term “attached”, and will send you a notification box if you try to send it sans any attachment. Again, if this saves you only once, you will probably want to go steady with Gmail too (you can’t because we’re already in a relationship, it’s complicated).
———————————————————————————————————————————————–
That’s it. I’m out of words. Be sure to make your thank you checks payable to “Good Badger, the“.

